Sunday, May 30, 2010

Strawberry Pie

Strawberry pie is one of my favorites and it's the perfect time of year to make one. We got some huge, yummy looking strawberries at the store to make this summertime treat.


Strawberry Pie

1 baked pie shell (I use Pillsbury refrigerated pie shell or feel free to make your own from scratch if so desired)*
1 qt. fresh strawberries
1 3 oz. pkg. strawberry jello
1 C. sugar
3 Tbsp. corn starch
1 1/2 C. boiling water
1 Tbsp. ReaLemon lemon juice
1 tsp. red food coloring
cool whip to top

Bake the pie shell and let cool.

Mix in a medium sauce pan the strawberry jello, sugar and corn starch until no lumps remain. Add the boiling water to the mixture and bring to a boil on the stove top. Reduce heat and boil 3-4 minutes or until mixture coats the spoon. Add the red food coloring and lemon juice. Cool the mixture 45-60 minutes.

Slice or halve strawberries and arrange in pie shell. Pour cooled mixture over strawberries. Top with cool whip and any extra strawberries if so desired.

*Do not prick the pie crust while baking. If you do (as I forgot and did - oops!) when you pour the cooled jello mixture over the strawberries it seeps down under the crust some and doesn't cover all the strawberries. Still tastes good though! :)

Saturday, May 22, 2010

Cherries Jubilee

Tonight I thought I'd make something fairly simple, yet tasty sounding. I'd never had Cherries Jubilee before, but thought it looked yummy. Plus you get to set it on fire and how cool is that?

First I didn't have a cherry pitter so I did some looking online to see what other people suggested to use to get the pit out. Several people recommended using a bobby pin or a paper clip. I happened to have some bobby pins laying around and chose that route. Let me tell you it was virtually impossible for me to get the pit out and leave the cherries looking pretty/intact. But it did work.

I was a little nervous about setting it on fire, and the flames did go up a bit higher than I expected, but they subsided quickly. Wish I had gotten a picture of it!

Overall a very tasty and fairly quick dessert to make.

Cherries Jubilee

Ingredients:

1 Pint vanilla ice cream
1 lb. fresh ripe sweet cherries such as Bing
1/2 C. sugar
1 lemon
1/3 C. golden rum

Evenly scoop the ice cream into 4 dishes or decorative glasses and put in the freezer until ready to serve (this can be done up to 4 hours ahead).


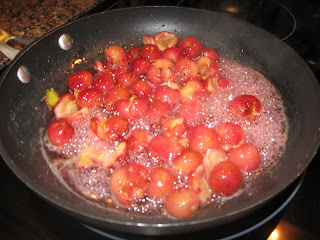
Wash and pit the cherries. Put the cherries and sugar in a large skillet. Peel 2 strips of zest from the lemon in wide strips with a peeler and add to the cherries. Squeeze the juice of half the lemon over the top. Stir to combine evenly. Cover and cook the cherries over medium-low heat until the sugar dissolves, about 4 minutes. Uncover and cook over medium-high until cherries get juicy, about 5 minutes more.

To flambe the rum: If cooking over a gas flame, pull the pan off the heat and add the rum. Ignite the alcohol with a long match or one held with tongs. Swirl the pan slightly until the flames subside, about 30 seconds.

If cooking over an electric stove, put the rum in a small sauce pan. Warm it over medium-low heat and carefully light it with a long match or one held with tongs. Pour the lit rum over the cherries, and swirl the pan lightly until the flames subside, about 30 seconds.

Ladle the cherries and their juices over prepared ice cream scoops. Serve immediately.


Eat quick, because the ice cream starts to melt pretty fast! Yum Yum!

Thursday, May 13, 2010

Pasta Verde

Now I know I was intending to have this blog be strictly about baking, but I figured if I throw something else in every now and then no one would mind, right?

Last month I joined a local cookbook club. We choose a cookbook and use it for several months in a row. Each time we get together (once a month) each person brings a recipe they made from that particular cookbook. This month (and the next 2 months) we're using Martha Stewart's Dinner at Home cookbook.

This particular cookbook is nice because Martha has divided it up into seasons. Each season includes recipes featuring produce that is in season at that time. Last month (my first month at cookbook club) they started with spring. This month we did summer. The recipe I chose was Pasta Verde.

Ingredients

1 Tbsp coarse-grain mustard
2 Tbsp white wine or sherry vinegar
1/4 C. extra-virgin olive oil
coarse salt and freshly ground pepper
1 lb. gemelli or other short pasta shape
1 sweet onion, halved lengthwise, then cut crosswise 1/4 in. thick
2 small zucchini, halved lengthwise, then cut crosswise 1/4 in. thick
8 oz. snap peas, trimmed, tough strings removed
3 oz. baby spinach
1 small bunch scallions, trimmed and thinly sliced
1/4 C. loosely packed fresh basil leaves, thinly sliced

Bring a large pot of water to a boil. Whisk together mustard and vinegar; slowly add 2 tablespoons oil, whisking constantly until emulsified. Season with salt and pepper.

Once water is boiling, add 2 tablespoons salt. Cook pasta until al dente according to package instructions. Drain; return to pot.

Meanwhile, heat remaining 2 tablespoons oil in a large skillet over medium. Cook onion until just softened, stirring occasionally, about 4 minutes. Add zucchini; cook, stirring, until tender, 2-3 minutes. Add snap peas; cook, stirring, until crisp-tender, about 2 minutes.

Remove pan from heat; stir in spinach, scallions, and basil. Add to pasta along with vinaigrette; toss well to combine. Serve warm or at room temperature.


Overall I think the recipe turned out well. I didn't have the fresh basil (I wasn't paying too much attention at the store and grabbed parsley instead - oops!) so I used dried basil. It had some great textures to it, especially with the crunch of the snap peas.

Other great recipes made were spicy stir-fried shrimp, balsamic mushrooms, creamed corn w/jalapeƱos, and lemon mousse. Quite a tasty meal!

Saturday, May 8, 2010

Monster Cookies


Yesterday I had the urge to bake something. It was rainy and windy out and I just didn't want to go anywhere. So I started looking through cookbooks to see what I could make with stuff I already had at home. Turned out that I had just enough ingredients to make Monster cookies from Baked (I LOVE this cookbook if you hadn't noticed).

Ingredients:

1/2 C. all-purpose flour
1 Tbsp baking soda
pinch of salt
5 3/4 C. rolled oats
3/4 C. (1 1/2 sticks) cold unsalted butter, cut into cubes
1 1/2 C. firmly packed light brown sugar
1 1/2 C. granulated sugar
5 large eggs
1/4 tsp light corn syrup
1/4 tsp pure vanilla extract
2 C. creamy peanut butter
1 C. semisweet chocolate chips
1 C. M&Ms

Whisk the flour, baking soda, and salt together. Add the oats and stir until the ingredients are evenly combined.

In the bowl of an electric mixer fitted with the paddle attachment, cream the butter until smooth and pale in color. Add the sugars and mix on low speed until just incorporated. Do not overmix.

Scrape down the bowl and add the eggs, one at a time, beating until smooth and scraping down the bowl after each addition. Add the corn syrup and vanilla and beat until just incorporated.

Scrape down the bowl and add the peanut butter. Mix on low speed until just combined. Add the oat mixture in three additions, mixing on low speed until just incorporated.

Use a spatula or wooden spoon to fold in the chocolate chips and M&Ms. Cover the bowl tightly and refrigerate for 5 hours.

Preheat the oven to 375. Line baking sheets with parchment paper.

Use an ice cream scoop with a release mechanism to scoop out the dough in 2-tablespoon size balls onto the prepared baking sheets, 2 inches apart. Bake for 12-15 min., rotating the pans halfway through the baking time (I didn't rotate them and they turned out fine for me), until the cookies just begin to brown. Let cool on the pans for 8-10 min. before transferring the cookies to a wire rack to cool completely.


Note that after making the dough I thought it seemed like an awful lot for just the 36 cookies that the recipe says it makes. Turns out it's double the amount of dough, so if you make the recipe as given you will end up with 72 cookies instead of 36. That's A LOT of cookies!! I have way too many to eat with just 3 of us at home. Fortunately we'll be visiting my parents soon and can unload some on them! Plus I might send some with my husband to work next week. I'm on cookie overload!!

The authors also said that they specifically bought bags of orange only M&Ms which was their favorite at www.m-ms.com. I, on the other hand, only had a bag of valentine M&Ms at home (dark pink, light pink, red, and white mixture). The orange in the cookbook's picture looks much more appetizing than my valentine colors.

Friday, April 23, 2010

Banana Espresso Chocolate Chip Muffins


Between my son and me we had already eaten 3 before I remembered to take a picture!


Once again I delved into Baked for a breakfast treat - Banana espresso chocolate chip muffins (without the espresso since I couldn't find instant espresso powder).
While I don't like coffee, I'm actually kind of bummed that I couldn't find the instant espresso powder since I thought it would be quite tasty in these muffins.

1 1/2 C. mashed, very ripe bananas (about 4 medium)
1/2 C. sugar
1/4 C. firmly packed light brown sugar
1/2 C. (1 stick) unsalted butter, melted
1/4 C. whole milk
1 large egg
1 1/2 C. all purpose flour
1 tsp. instant espresso powder
1 1/2 tsp. baking soda
1 tsp. salt
1 C. semisweet chocolate chips

Preheat the oven to 350 degrees. Spray a 12 cup* muffin pan with nonstick cooking spray or line with muffin tins (I like the silver foil ones since muffins don't stick to them when removing).

In a medium bowl, stir together the bananas, sugars, butter, milk, and egg.

In another medium bowl, whisk together the flour, instant espresso powder, baking soda, and salt. Make a well in the middle of the dry ingredients. Pour the wet ingredients into the well and stir until just combined. Fold in the chocolate chips.

Fill each cup about 3/4 full. Bake in the center of the oven for 20-25 min, until a toothpick inserted in the center of a muffin comes out clean.

Move the muffin pan to a cooling rack, and let cool for 15 min. After 15 min, remove the muffins from the pan and let them finish cooling on the cooling rack.

*I actually ended up with enough batter to make 14 muffins

Tuesday, April 20, 2010

Sour Lemon Scones


I recently picked up Baked by Matt Lewis and Renato Poliafito. It didn't take me long to decide that I needed to make pretty much every recipe in this book. Today I decided to make the very first recipe; sour lemon scones. These were magnificent!

They were quite easy to make although I must admit I always have problems with kneading scone dough to start with. And today I also had the added disadvantage of my two year old insisting on helping with everything, down to zesting lemons and kneading the dough - all with a runny nose.

Ingredients:
4 C. all purpose flour
1/2 C. sugar
1 Tbsp baking powder
1/2 tsp baking soda
1/2 tsp salt
1/2 tsp ginger
1 1/2 C. (3 sticks) unsalted butter, cubed and cold
1 large egg
1 C. buttermilk
1/4 C. grated lemon zest (about 3 lemons)
1/2 C. diced candied lemon peel (optional)
2 Tbsp raw sugar

Preheat the oven to 350. Line a baking sheet with parchment paper.

In a large bowl combine the flour, sugar, baking powder, baking soda, salt, and ginger. Whisk until combined.

Add the butter. Use your fingertips to rub the butter into the flour until the butter is pea sized.

In a separate bowl, whisk together the egg, 3/4 C. of the buttermilk, and the lemon zest. Slowly pour the wet ingredients into the dry ingredients, and then gently knead the dough with your hands until the dough starts to come together. If using, add the candied lemon peel and knead to incorporate. Move the dough to a lightly floured surface. Use your hands to shape the dough into two discs (about 1 1/2 in. in height). Do not overwork the dough.

Cut each disk into 6 wedges. Place the wedges onto the prepared baking sheet. Brush each scone with the remaining buttermilk and sprinkle with raw sugar. Bake in the center of the oven for about 25-30 min (rotating the baking sheet halfway through the baking time) or until the scones are golden brown.

Transfer the scones to a cooling rack. You can serve slightly warm or completely cooled.

I made the straight recipe without adding in diced candied lemon peel. They had a wonderful rich texture to them and the raw sugar on top added a little bit of sweetness to the scones. Definitely a keeper!

Sunday, April 11, 2010

Peaches and Cream Cheesecake


This past weekend I took a request from my parents on what to bake. Their choice was the Peaches and Cream Cheesecake from my Juniors Cheesecake Cookbook.

Now Juniors cheesecakes have a sponge cake crust, which is excellent, but very time consuming in my opinion. So I chose to make your typical graham cracker crust for the base of this cheesecake. The recipe I use for the graham cracker crust is as follows:
1 C. (6 crackers) of graham cracker crumbs
3 Tbsp. sugar
3 Tbsp. melted unsalted butter
Grease the bottom and sides of a 9 inch springform pan. Cover bottom and all the way up the sides with aluminum foil. Mix all ingredients together until crumbly and press into pan. Bake 10 min. at 325 degrees. Cool.

This particular cheesecake has a peach filling (naturally) that is like a peach pie filling and is then covered (after cooling) with a cinnamon crumb topping. You could even add both of these to ice cream and it would make an excellent dessert.

Peach filling:
10 oz. dry-pack frozen whole peaches (not in syrup), thawed (I could not find these at my local store and so I used 3 fresh peaches instead)
1/2 cider or apple juice
1 Tbsp. cornstarch
1 Tbsp. sugar
1/8 tsp. ground cinnamon
Drain the peaches on paper towels (important). Cut into bite sized pieces. The recipe suggests leaving about 5 slices whole to decorate the top of the cheesecake with, but mine started turning brown and so I skipped it. Pour the cider or apple juice into a small saucepan and whisk in the cornstarch, sugar and cinnamon. Bring to a full boil, stirring continuously. About a minute after it boils it will start to thicken and turn a deep golden color. Remove from heat and add the peaches. Cool.

Cheesecake filling:
3 8 oz. packages cream cheese (room temperature)
1 1/3 C. sugar
1/4 C. cornstarch
1 Tbsp. vanilla
2 eggs
2/3 C. whipping cream
Put one package cream cheese, 1/3 cup of the sugar and the cornstarch into a mixing bowl and cream together. Add the remaining packages cream cheese one at a time making sure to scrape down the bowl after each addition. Add the remaining sugar and the vanilla. Add the eggs one at a time making sure to beat well after each addition. Beat the cream in just until blended. Gently pour mixture over the crust. Spoon peach filling over the top and almost to edges of pan.
Place the cheesecake in a large shallow pan containing 1 in. of hot water. Bake at 350 degrees about 1 1/4 hours until the edges are light brown and the top is slightly tan. (Mine should have baked longer than the 1 1/4 hours as my center did not set up completely - so be sure to have the top lightly browned as your guideline). Remove from the water bath and place on a wire rack to cool for 2 hours. Cover loosely with saran wrap and place in the fridge to finish cooling for at least 4 hours.

Crumb Topping:
3/4 C. all-purpose flour
1/3 C. firmly packed brown sugar
1/2 tsp. ground cinnamon
grated rind of 1 large lemon (about 1 tsp)
1/2 C. (1 stick) cold unsalted butter cut into small pieces
Preheat oven to 350. Butter a 9x13 pan. Mix the flour, brown sugar, cinnamon and lemon rind together. Add cut up butter and work in with your fingers until crumbly. Spread out in prepared pan and bake for 15 min. Be sure to toss the mixture 2-3 times and remove when it becomes a light golden brown. Let it cool on a wire rack for half an hour and then brake into small crumbs.

When decorating the cheesecake, remove the sides of the springform pan carefully. Top with crumbs covering the entire cheesecake. Decorate with reserved peach slices (if you choose do so). Refrigerate until ready to serve. Enjoy!

Thursday, April 8, 2010

Love to bake

There's something relaxing about baking; the delicious smells perhaps? Given the opportunity I think I would bake something everyday. Not so good for the waistline however!
I usually make the same things though - cheesecakes, banana bread, brownies, a cake from a box mix or cookies.
My goal here is to try new baking experiences. Not an easy thing to do with a 2 year old running underfoot, but something I'm willing to try. Hopefully I can try something new once a month. If things go well perhaps twice a month.
Check back for my escapades in the art of baking!

Jenny